Premium product support service & resources
FAQ
Here is a collection of frequently asked questions you may find helpful in implementing and using Intertec TimePro. Please contact us if you are still having difficulties.
About Intertec TimePro, how to buy, licencing options
- What is Intertec TimePro?
- Quick Guide to Getting Started
- Why should I use Intertec TimePro over other timesheet solutions?
- What is the difference between Intertec TimePro Hosted and Intertec TimePro In-House?
- How is Intertec TimePro licenced?
- How can I buy Intertec TimePro?
- Is support and maintenance included in the price?
Video Tutorials
- How to change the MYOB Customer Name linked to a Intertec TimePro Customer?
- Change Period Type in Intertec TimePro
- Overview on the Data Export in Intertec TimePro
- Historical rate change in Intertec TimePro
- Bulk change in Intertec TimePro
- Standard rate change - Intertec TimePro
Supported web browsers
- Will Intertec TimePro run on any web browser?
- What browser settings do I need to run Intertec TimePro?
Setting up Intertec TimePro Hosted
- What kind of computer system do I need to use Intertec TimePro Hosted?
- Who sets up the information such as Staff, Projects, Customers and Suppliers?
- Is there a limit to the number of Customers or Projects we can create in Intertec TimePro?
- Can I integrate Intertec TimePro into my Web Site / Intranet?
Installing Intertec TimePro In-house
- What kind of computer system do I need to use Intertec TimePro In-House?
- Can I set up Intertec TimePro on our local server?
- I’m experiencing some problems with the Intertec TimePro In-House IIS Web Server configuration.
- Active Directory implementation instructions
Using Intertec TimePro, logging in, passwords
- I have forgotten my password, what should I do?
- I am unable to log in to Intertec TimePro. What do I do?
- The system seems to log users out after a certain period of time, is it possible to change this so that users can have timesheets open all day?
- I log on, and am immediately logged off. What do I do?
- Response times when using Intertec TimePro is very slow (more than two seconds for a page to load). What can I do?
- How does Intertec TimePro Single Sign-On integration work with Microsoft Entra ID
- How do I setup Intertec TimePro Single Sign-On integration with Microsoft Entra ID
- How does Intertec TimePro's Single Sign-On (SSO) implementation meet level 1 Essential 8 Compliance Requirements
Time entry, editing timesheets, recording leave, recording expenses
- Does Intertec TimePro support alternative time entry formats?
- How do I change a timesheet period from say Sun-Sat to Mon-Sun?
- How do I edit a timesheet that has already been completed?
- Can users review their timesheets at any stage?
- Can I record leave and holiday times in Intertec TimePro?
- Intertec TimePro won't let me enter 24:00 as a finish time. Is there a fix or workaround for this?
- Can Intertec TimePro be used as a diary or scheduling tool?
- Can Users send their timesheets via email?
- Can I record project expenses in Intertec TimePro, eg. meals, petrol/km, equipment etc?
- How do I compress the file size of my expense receipt images on my smartphone?
- How do I compress the file size of my expense receipt images on my computer?
Managing Intertec TimePro users
- How does user licencing work? Does the Intertec TimePro user licence allow us to activate certain users at different times, depending on who are currently working on jobs and projects?
- We currently have a lot of contractors who may work one week but not the next. Is there a way we can lock the timesheet for specific staff if we know they are not working that week?
- We have 3 offices, A, B, C and we would like to be able to 'group' people. For example the ‘A’ office would like to be able to print out a total billable time for all their employees across all their projects. Is this possible?
- Can I restrict the Tasks staff see on a certain project?
- The system seems to keep timesheet approvers (Managers) separate from timesheet users (Staff). Am I right to assume that if someone is a project manager, and therefore a Manager, but must also complete timesheets (Staff) they need to have 2 IDs – one as a Staff member, and one as a Manager?
- How to release a report to a non-admin user?
Charge and cost rates, non-billable projects
- How do we apply different rates for work on different Projects?
- Can we mark work as non-billable ie. still pay contractors but not charge the client?
- How do I change rates in Intertec TimePro?
Security and back-up
- Is the data I enter in Intertec TimePro safely and securely backed up?
- Is the information that I enter into Intertec TimePro both safe and secure?
- What is the recommended approach for Backup/Recovery of Intertec TimePro In-House?
Exporting Intertec TimePro data
MYOB Integration
- Getting started with Intertec TimePro plus MYOB – Overview / Detail
- If multiple people are working at one client, will they all appear on the one invoice?
- When doing a Time Billing Sales Invoice export, is there any way you can export information contained in the Description of Tasks Undertaken field to the Notes field in MYOB instead of just having the Staff/Project description exported to the Notes field?
- How do I integrate Intertec TimePro with MYOB Activity Slips for payroll integration in MYOB?
- How do I show the notes carried over from the Intertec TimePro Activity Slips Export on an invoice rather than the Activity ID?
- I would like to associate the Activity ID with the Task rather than the Staff Project. Is this possible?
- Can I import expenses into MYOB?
- How to import activity slips from Intertec TimePro to MYOB with a combination of chargeable and non-chargeable tasks?
- How to change customer names?
QuickBooks Integration
- Getting started with Intertec TimePro plus QuickBooks – Overview / Detail
- How do I connect the Intertec QuickBooks Transaction Importer (QBTI) to a different QuickBooks file?
- I would like to associate the Service Item with the Task rather than the Staff Project. Is this possible?
- How to change customer names?
Xero Integration
- Importing data from Xero into Intertec TimePro
- Using Intertec TimePro to generate Sales Invoices in Xero.
- Using Intertec TimePro to generate Purchases Invoices in Xero.
- Using Intertec TimePro to generate Timesheets for Payroll processing in Xero.
- How to change customer names?
Support and training
- What kind of technical support can I expect?
- What training tools are available to provide the team on basic operating functionality?
Customising Intertec TimePro
- The standard Intertec TimePro reports don't give me the data that I want. Can I have a custom report created and, if so, what is the cost to have a custom report written?
- Can I include my company logo in Intertec TimePro, eg. I’d like to have the company logo on the timesheets.
- How do I add custom timesheet templates to my Intertec TimePro In-House installation?
- Web Service
Migrating Intertec TimePro data
- If we started with the hosted solution and then later wanted to purchase the software and install it on our own network, would we be able to get the database downloaded?
- We would want to have the ability to archive timesheets that are more than 3 years old in our Intertec TimePro Hosted system. Is this possible?
- How do I move my Intertec TimePro In-House installation to another server?
- How do I move my Intertec TimePro In-House database to another server?
Configuring Intertec TimePro settings
Technical issues
- The timesheet entry screen takes a very long time to load (more than 2 seconds). Why is that?
- Pages I revisit show old data. What do I do?
- Data appears to save correctly, but I see the original data again, not the saved data. What can I do?
- Why doesn’t the pop-up calendar appear when I click on the calendar icon?
- Can I use Intertec TimePro while also running a personal firewall or content filter on my computer?
- Why can’t I receive emails generated by Intertec TimePro?
- What do I do if I’m still experiencing web browser issues running Intertec TimePro?
About Intertec TimePro, how to buy, licencing options
A: Intertec TimePro is an easy to use, web timesheet management system. It's simple - your staff can enter their timesheets, anywhere and anytime, via the web. All you need is a computer or mobile device, and access to the Internet. Intertec TimePro is available both as a solution hosted in the Cloud (see Intertec TimePro Hosted) or you can purchase Intertec TimePro to install and run on your own Servers (see Intertec TimePro In-House).
![]()
Q: Why should I use Intertec TimePro over other timesheet solutions?
A: Intertec TimePro has been developed specifically for the web. The application interface for both Administrators and General Users is entirely web-based. This allows us to offer you the option to use Intertec TimePro Hosted in the Cloud or if you prefer, the option to purchase a licence for Intertec TimePro In-House to host the application on your own Servers.
Intertec TimePro is so easy to use that it requires no formal end-user training. This means your staff will be productive in entering their timesheet records from day one. The application is also highly configurable so it can be simply tailored for your business when setting up initial system parameters.
![]()
Q: What is the difference between Intertec TimePro Hosted and Intertec TimePro In-House?
A: We encourage all of our In-House clients to consider moving to the Hosted Platform. We are phasing out the In-House Product.
For more information on this please contact our Support Team.
Contact us Monday through Friday, 8.30am to 5.30pm (GMT +8 hours) on +61 (8) 9286 3911 or email support@timesheets.co.nz
![]()
Q: How is Intertec TimePro licenced?
A: Intertec TimePro is available as a Hosted or In-House option. In both cases pricing is based on the number of user licences purchased with your Intertec TimePro account. User licences begin with 5 users, and increase in intervals of 5 users to 50 users, and in intervals of 10 users after that. Hence, if you have 23 staff, you would purchase a 25 user licence. Or, if you have 63 staff, you would purchase a 70 user licence.
For pricing information see the Purchase section on our website.
Information about our Licence Model is also covered in more detail in a separate FAQ which you may like to refer to: How does user licencing work?
![]()
Q: How can I buy Intertec TimePro?
A: Intertec TimePro Hosted is available as a timesheet solution hosted in the Cloud, offered on a low-cost monthly or annual subscription basis. Intertec TimePro In-House can also be purchased as an ''off-the-shelf'' licensed package that you deploy in-house on your local network or Intranet.
We also offer custom tailored hosted and in-house solutions to Clients who have specific timesheet requirements.
![]()
Q: Is support and maintenance included in the price?
A: Intertec TimePro Hosted has support and maintenance built into its subscription price. The pricing for Intertec TimePro In-House comes with support and maintenance for the first year; you can choose to continue Intertec TimePro support and maintenance after the first year at 20% of the user licence price per annum. Support is available via telephone and email.
![]()
Video Tutorials
Q: How to change the MYOB Customer Name linked to a Intertec TimePro Customer
![]()
Q: Change Period Type in Intertec TimePro
![]()
Q: Overview on the Data Export in Intertec TimePro
A: Below is the procedure to export your data.
- Go to Timesheets | Data Export.
- Type in a name under New Export Name and choose ‘Time Data’ from Export Type.
- Click Add New Export.
- Select the fields required. If you would like to export all the data tick ‘Select All’ above each column. (Note: ‘Worked’ is the number of hours)
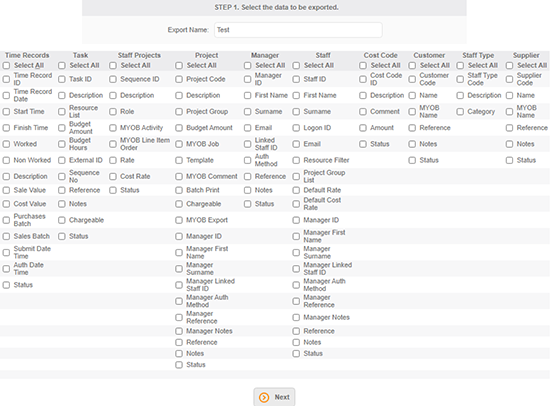
- Click Next
- Click ‘Summarise Records’ if you would like a summary report. If you would like a report with one line for every time record selected, then leave this checkbox unticked.
- Use the filters to limit the data to be exported.
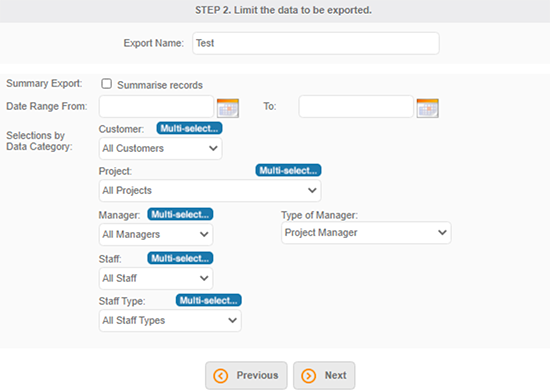
- Click Next.
- Choose output format.
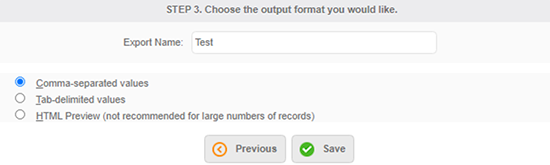
- Click Save.
- To run click on the blue play button to run the export and follow the screens.

![]()
Q: Historical rate change in Intertec TimePro
![]()
Q: Bulk change in Intertec TimePro
![]()
Q: Standard rate change - Intertec TimePro
![]()
Supported web browsers
Q: Will Intertec TimePro run on any web browser?
A: Intertec TimePro is designed to work correctly with as wide a range of browsers as possible. For the technically-minded, using Intertec TimePro requires a browser which supports Javascript, cookies and CSS1 stylesheets. In practice, this means that most browsers currently in use will work perfectly well with Intertec TimePro.
At the time of writing, we have tested Intertec TimePro with a number of browsers:
- Microsoft Internet Explorer 7 and later
- Mozilla Firefox 3.6 and later
- Opera 11 or later
- Safari 5
- Google Chrome 12
All these browsers support a page preview mode which handles page breaks correctly.
![]()
Q: What browser settings do I need to run Intertec TimePro?
A: Intertec TimePro does not use any unusual features, and will work correctly with the default settings that browsers are usually installed with. If you have changed the settings, you may run into problems. Below is a guide to setting up your browser to work correctly with Intertec TimePro.
The features Intertec TimePro needs are:
- Cookies
- Javascript
- CSS1 stylesheet support
- Clearing the local cache
- Proxy servers should be disabled
- From the menu, choose Edit.
- Now choose Preferences.
- Expand the Privacy category in the toolbar at the top of the dialogue.
- CIn the Cookies panel, make sure that the "Accept cookies from sites" box is ticked.
- It is enough to choose "Keep until I close Firefox".
- Choose OK to save the changes.
- From the menu, choose Edit.
- Now choose Preferences.
- Expand the Advanced category in the left-hand panel.
- Choose Scripts & Plugins.
- Make sure that Enable Javascript for Navigator is selected.
- Choose OK to save the settings.
- From the menu, choose Edit.
- Now choose Preferences.
- Expand Advanced in the left panel and choose Cache.
- In the right panel, choose "Clear disk cache".
- In Netscape 4 only, you will need to confirm this action.
- Use OK or Cancel to close the Preferences dialogue.
- a direct connection to the Internet which bypasses your proxy server;
- your browser set up to ignore the proxy for the Intertec TimePro Web site.
- From the menu, choose Edit.
- Now choose Preferences.
- In the left panel, expand Advanced and choose Proxies.
- If possible, select "Direct connection to the internet".
- If you have manual proxies selected, with Netscape 4 you will need to choose the View button to see details. In the bottom section you can set domains for which the proxy server will be bypassed; specify the Intertec TimePro URL here.
- If you have automatic proxies selected, contact your network administrators about setting up the bypass.
- Choose OK to save the changes.
What a cookie is
A cookie is a small parcel of information which is sent to your computer, can be stored on your computer for a period, and can be requested to be returned from your computer. This information allows a Web site to "recognise" your computer when next you visit the site. Intertec TimePro doesn't store any information on your computer, but does use "session cookies", which maintain continuity between you and the Intertec TimePro site. Intertec TimePro uses the simplest kind of cookie, which is discarded as soon as you close your browser window, and is returned to the Intertec TimePro server only.
How cookies are used in Intertec TimePro
When you log on on to the Intertec TimePro site, a session is created to respond to you. This session has an ID number, and this number is passed to your browser in a cookie. When your browser sends another message to Intertec TimePro, this session identification number is returned with the message, and allows the message to be directed to the correct session, which "knows" what you were doing. If you don't respond for some time, this session will time out, all information it holds will be discarded, and you will have to log in again to use Intertec TimePro.
If cookies are disabled on your browser, Intertec TimePro has no way to maintain this continuity, and you are effectively logged out as soon as you move to the first screen after the login screen. Cookies must be used in order for you to use any site which presents something other than static data.
How to enable cookies in Mozilla
Javascript
Javascript is a programming language which allows the behaviour of your browser to be controlled to a limited extent by Intertec TimePro. If this is not enabled, then the buttons won't work, and some other features also won't work, and nor will cascading style sheets work in Netscape 4.x. For Intertec TimePro to work, then, Javascript must be enabled.
How to enable Javascript in Mozilla
CSS1 Style Sheets
The abbreviation stands for Cascading Style Sheets level 1, and refers to a mechanism for controlling the appearance of the displayed page. Support for level 1 of CSS is automatic for all the supported browsers with the exception of Netscape 4.x. Netscape 4 style support is dependent on Javascript, so turning on Javascript is a prerequisite for CSS to work and for Intertec TimePro to display correctly. Please refer to the section on Javascript for instructions on enabling stylesheet support in Netscape 4.
Most features of CSS2 are not supported at present (April 2003) by any browsers except Mozilla 1 or Netscape 6 and later. Even these browsers have incomplete support for CSS2. For this reason, Intertec TimePro uses only CSS1 features, with the exception of the page-break feature used in printing batches of timesheets - this is a CSS2 feature, and the limitation on browsers suitable for printing of timesheet batches is because of the inconsistent support for this feature.
Clearing the local cache
Your browser may have non-expired copies of pages dating from before the time you set the caching behaviour as described in the preceding section. To resolve this, you need to empty the cache of all the existing temporary files.
How to clear the local cache in Mozilla
Proxy Servers
Proxy servers maintain a local cache of pages visited by any of the browsers they serve, and will try to serve a page first from the local cache before downloading a fresh copy from the next computer in line. You have little direct control over this. Your network administrators may need to take action to permit these options to work correctly.
If you are still having problems with non-current pages being delivered, you should contact your IT support centre and ask them to arrange, if possible, for you to have one of:
In what follows, the Intertec TimePro URL referred to is the first portion of the Web address, up to the third "/" character, which you will find in the address panel after you have logged on - as an example: https://www.timesheets.co.nz/.
How to bypass a proxy server in Mozilla
![]()
Setting up Intertec TimePro Hosted
Q: What kind of computer system do I need to use Intertec TimePro Hosted?
A: As Intertec TimePro Hosted is completely web-based, you only require a computer or mobile device, an Internet connection and a web browser. Intertec TimePro Hosted works with all mainstream web browsers, including Internet Explorer. Mozilla Firefox, Safari and Chrome. Intertec TimePro is proven to operate on both PC and Mac platforms.
![]()
Q: Who sets up the records for Staff, Projects, Customers and Suppliers?
A: The system administrator is responsible for setting up the initial data for Intertec TimePro including tables such as Staff, Projects, Customers, and Suppliers. For customers with 20 or more staff and/or project records, we offer a free data upload service as part of your trial/setup process. To facilitate this we provide a template spreadsheet that includes instructions on how to populate the fields with your data.
![]()
Q: Is there a limit to the number of Customers or Projects we can create in Intertec TimePro?
A: Intertec TimePro has no limit on the number of Customer or Project records you can create. That said, Intertec TimePro is very flexible and there is usually more than one way the data can be setup.
If you have a large number of customer, project or staff records and are unsure how best to setup your data, then we encourage you to email/contact the Intertec TimePro Support Centre were one our experienced consultants can discuss your timesheet requirements and provide you with our recommendations for setting up your data to meet your time recording and reporting needs.
![]()
Q: Can I integrate Intertec TimePro into my Web Site / Intranet?
A: Yes, using the Intertec TimePro Logon Anywhere Feature. Intertec TimePro can be integrated with your Intranet or Web Site to allow staff to logon from your systems rather than the www.timesheets.co.nz web site.
An added benefit is that your staff no longer need to enter your assigned three character customer ID when logging on. This is seen as a major advantage of the Intertec TimePro system for many customers.
To take advantage of this FREE feature, simply cut and paste the sample code into a web page on your Intranet or Web Site. Remember to change ‘???’ to your assigned three character customer ID.
![]()
Installing Intertec TimePro In-house
Q: What kind of computer system do I need to install Intertec TimePro In-House?
A: Intertec TimePro In-House has the following system requirements:
Operating System:
- Windows® XP Professional
- Windows® Vista 32- or 64-bit version
- Windows® 7 32- or 64-bit version
- Windows Server™ 2003 Standard, Enterprise or Web Edition
- Windows Server™ 2008 Standard, Enterprise or Web 32- or 64-bit release
- Windows Server™ 2008 R2 Standard, Enterprise or Web 32- or 64-bit release
A Server version of windows is strongly recommended. It is not recommended that Windows Small Business Server (SBS) be used directly; rather, use a virtual machine hosted by SBS.
Software:
- Microsoft SQL Server® 2005/2008/2008 R2, or Microsoft SQL Server Express 2005/2008/2008 R2
- All supported versions of SQL Server Express may be downloaded from the Microsoft Web site. Intertec TimePro does not use any features introduced since the release of SQL Server 2005.
- A simple click-once installation of SQL Server Express 2005 is provided. Microsoft SQL Server Express 2008 and Microsoft SQL Server Express 2008 R2 do not permit such easy installation.
- SQL Server Express 2005 with Service Pack 3
- SQL Server Express 2008 with Service Pack 1
(Installs from the Web; may require installation of Windows Installer 4, Windows Powershell 1.0 and .NET Framework 3.5) - SQL Server Express 2008 R2 (recommended)
- Microsoft Internet Information Server® (IIS) 5.0 or later (included with the Windows operating system)
- Microsoft Visual Basic® 6 runtime components - all recent versions of Windows have the latest VB6 components; if you are running an older version of Windows or have not installed these components, the following Microsoft KnowledgeBase article provides a link to the latest version if required: Knowledge Base Article - 290887
- Microsoft .NET Runtime version 2.0 - this is automatically part of Windows updates, or can be downloaded from Microsoft's servers: https://www.microsoft.com/download/en/details.aspx?displaylang=en&id=19
Supported Web Browsers:
- Microsoft Internet Explorer 7 and later
- Mozilla Firefox 3.6 and later
- Opera 11 or later
- Safari 5
- Google Chrome 12
Disclaimer: With frequent security and other updates being made to browsers, it is possible that some minor incompatibilities may be introduced. We do our best to resolve such issues once we become aware of them.
The most commonly-used browsers are Microsoft Internet Explorer and Mozilla Firefox, and our testing is most exhaustive on these browsers. For other browsers not listed above, we do not do rigorous testing, but they should work as long as the browser complies with Internet standards.
Minimum Hardware:
- Intel Pentium III or later
- 128Mb RAM
- 60MB free disk space for Intertec TimePro In-House
- 430MB free disk space for Microsoft SQL Server Express
![]()
Q: Can I set up Intertec TimePro on our local server?
A: Yes, Intertec TimePro In-House is the product designed for in-house deployment. More information about Intertec TimePro In-House is available here.
![]()
Q: I’m experiencing some problems with the Intertec TimePro In-House IIS Web Server configuration.
A: Intertec TimePro In-House is the product designed for in-house deployment, more information about Intertec TimePro In-House is available here. Below are a few common IIS Web Server configuration issues along with resolutions you and/or your IT staff might find useful.Symptom: You get Server Map Path ASP error.
Resolution: Manually Set "Map Paths" ASP Setting:
- Open the Management Console (Start, Control Panel, Administration Tools, Internet Information Services (IIS) Manager);
- Expand the local computer, web sites and default web sites nodes (click on + symbols);
- Right click and choose properties on your Intertec TimePro virtual directory.
- Click the Virtual Directory tab and choose the 'Configuration' button on that tab.
- Click the Options tab and make sure the "Enable parent paths" setting is enabled.
Symptom: Intertec TimePro In-House website is not displaying at all.
Resolution: Enable dynamic content, which is by default disabled:
For desktop versions of Windows:
- Open the Management Console (Start, Control Panel, Administration Tools, Internet Information Services (IIS) Manager);
- Expand the local computer node (click on + symbol);
- Click on Web Service Extensions;
- Locate Active Server Pages (ASP) in the list;
- Click the Allow button if it is not already allowed.
For server versions of Windows:
- Open Server Manager (Start, Administrative Tools, Server Manager);
- Select Roles in the left panel, and scroll down to the Web Server (IIS) section;
- Add the following role services as necessary: ASP.NET, ASP, CGI, ISAPI Filters, ISAPI Filters, Server Side Includes.
![]()
Q: Active Directory implementation instructions
Active Directory Implementation Overview
The following instructions are for Intertec TimePro In-House installations that are running v5.4 or later and who wish to implement Active Directory authentication.
Active Directory authentication removes the need for users to have a Intertec TimePro password, and thus they no longer need to Logon to Intertec TimePro via the standard logon screen. Instead Intertec TimePro accesses the user’s Active Directory network logon and uses this as the authentication source for gaining access to Intertec TimePro
Implementation Steps
- Instruct your DBA to perform a backup of your current Intertec TimePro database.
- Ensure you have a recent backup of the server on which your Intertec TimePro web application resides.
- All users will need to be assigned "Read & Execute" permissions to the website pages which includes all files and subfolders in the following location (…\Intertec TimePro InHouse\Web\...)
- All users will also additionally need “Write” permission to (...\Intertec TimePro InHouse\Web\TP54\User\...) subfolder and all its files and subfolders.
- The Intertec TimePro Logon screen is no longer presented to the user.
If the user’s current Active Directory network logon is a valid Intertec TimePro logon then they will be automatically logged on to Intertec TimePro and be shown the ViewTimesheet screen.
Note: If the user’s current Active Directory network logon is NOT a valid Intertec TimePro logon then they will not be able to access the Intertec TimePro system. - The Settings > Change Password function is no longer available
- The Logout icon on menu bar is removed
- The Password Column and Password Reset feature on the Staff Admin screen is removed
- The Password field is hidden on the Staff Edit screen (For add and copy mode)
1. Back up Intertec TimePro Database and Server
2. Intertec TimePro Preparation
-
Ensure that all of your Logon ID’s on the Staff Listing screen in Intertec TimePro match your Active Directory network logons.
3. Database Update
-
Have your Database Administrator run the following script in Microsoft Query Analyser against your Intertec TimePro database.
This will reset all your Intertec TimePro passwords as they will no longer be used by the Intertec TimePro system.
UPDATE TP_Staff SET password='[NetworkPW]'
GO
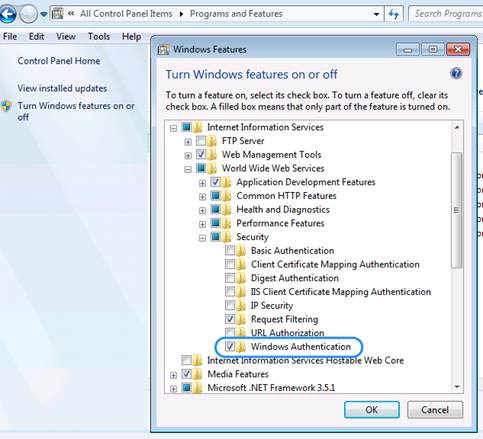
4. Check that Windows Authentication is Enabled on your Server
Within the “Windows Features”, ensure that “Windows Authentication” is enabled under IIS->World Wide Web Services->Security.
Please see following screen shot which shows this setting.
5. Configure IIS to run Intertec TimePro with Active Directory
Within IIS Manager, disable “Anonymous Access” on the Intertec TimePro application. Ensure that the authentication method is set to “Integrated Windows Authentication” (formerly called NTLM and also referred to as Windows NT Challenge/Response authentication). Please see following two screen shots which show these changes.

6. Set File Permissions
7. Test the Active Directory Implementation
You have now enabled Intertec TimePro to use Active Directory Authentication. You should test the application now to ensure that everything is working correctly. You should notice the following changes in the application:
Intertec TimePro application changes you will notice after configuring IIS to use Active Directory authentication![]()
Using Intertec TimePro, logging in, passwords
Q: I have forgotten my password, what should I do?
A: If you’ve forgotten your password, you can use the “Forgotten Password?” link to have your password reset automatically to the default password. The Intertec TimePro software will then email you the default password, which you can change once you log into the system.
For security reasons our staff are not authorised to view, change or distribute logons and passwords.
![]()
Q: I am unable to log in to Intertec TimePro. What do I do?
A: Intertec TimePro as a hosted application service can be logged into using www.timesheets.co.nz web site. You will require a valid Company ID, Name and Password to log into the application.
Intertec TimePro In-house will be accessible through the corporate private network. You will only require a valid Name and Password to log into the application.
Some of the reasons why the system might not allow you to login include:
- Your Intertec TimePro Administrator may have disabled access to Users. If you are a Intertec TimePro user, contact your Administrator and check.
- The license key has expired - Please contact your administrator or Intertec TimePro to renew your annual license subscription.
- The license key is invalid - Please contact your administrator or Intertec TimePro to re-issue you with a valid license key.
- Unable to access the login page - Intertec TimePro Hosted might be temporarily down for site maintenance at the Internet Service Provider. If the hosted application cannot be accessed for a lengthy period (> 30mins), then Intertec TimePro will make best attempts to notify you of any such delay. If you are unable to login into the corporate application then please contact your system administrator.
![]()
Q: The system seems to log users out after a certain period of time, is it possible to change this so that users can have timesheets open all day?
A: Yes. Intertec TimePro has two relevant configuration parameters under the ‘Settings’ option on the main application toolbar > System Tab that will affect the time a browser session is active.
Session Timeout Period: Change the ‘Session Timeout Period’ from 60 (minutes) to any duration up to 600 minutes (ie. 10 hours).Please note that this setting is not 100% effective as web servers will tend to clean up inactive sessions if they are not being used and the web server is under heavy load.
Session Refresh Period: This option allows an automatic page refresh to be performed on the View Timesheet screen and Compact version display screens at a specified interval. Provided the user leaves the View Timesheet Screen with context then this is a useful method to keep a timesheet session active to avoid session timeouts and the need to logon again.
![]()
Q: I log on, and am immediately logged off. What do I do?
A: You log on in the normal way, and your login details are accepted, but you then get a mostly-blank screen with the Intertec TimePro header and a grey box, with the words "Not logged on" near the top right.
Resolution: You probably have cookies disabled. Intertec TimePro depends on a session cookie, a small parcel of text, being passed back and forth between your browser and the application. This session cookie allows the server to route your responses to the correct session of Intertec TimePro. The session cookie is discarded as soon as the session ends, and carries no information other than the session identifier. You need to enable cookies.
If this doesn't work, you may have internet security software which is causing the problem, which would need to be resolved by your in-house technical staff.
Note that in version 3.3.1 and later of Intertec TimePro, you will also see a message at the top of the page advising you that cookies are disabled. This message provides a link to a help page which tells you how to enable cookies.
![]()
Q: Response times when using Intertec TimePro are very slow (more than two seconds for a page to load). What can I do?
A: Symptom: It takes more than 2 seconds for the timesheet entry screen to display.
Resolution: Customers with a large number of active Projects may experience slower performance on the Time Entry screen for users who have been assigned to a large number of active projects. A “large number of active projects” assigned to a person may be as few as 100 if you are using Project Specific Tasks or as many as 300 if you are not using Tasks at all.
If you or your Intertec TimePro users (choose someone who is assigned to many Projects) have noticed that accessing the Time Entry screen is slow to load (takes more than 1 or 2 seconds to appear), then there are a number of things you can do to improve your performance.
How to Speed Up your Intertec TimePro System:
- Reduce the number of Active Projects
As Projects are completed, it is a good idea to edit the relevant Project records and set their status to “Disabled”. This will stop old Projects from appearing in Staff members Time Entry Projects list. - Review Use of Global Projects function
If you have a large number of active Projects in your system (more than 100), avoid using the Global Projects function, as this will assign all active Projects to all active Staff records in the system. If you have more than 100 active Projects it is recommended that you enable the “Manage My Projects” function, which allows Staff to add or remove themselves from Projects as needed, OR, have your Intertec TimePro administrator attach Staff members to Projects on an “as required” basis, so that Staff are only attached to Projects that are relevant to them and not every active Project in the system (see Intertec TimePro Help for more information on “Global Projects” and “Manage My Projects”). Note: If you wish to stop using the Global Projects functionality then simply edit each of your Projects and change the “Global Project” field to “Do not automatically assign Staff”, and then follow the instructions below to reduce your number of Staff Project records. - Reduce the number Staff Project records
If you have determined that you have too many Staff allocated to Projects that are not relevant to them, you can solve this in one easy step. Use the Bulk Change->Bulk Delete feature on the Admin->Staff Projects screen to delete all Staff Project assignments that have not had any time or expense data recorded against them. Note: you need to press the Display button before you can access the Bulk Change button. Select either a particular Staff member one by one to cleanup one at a time or leave as “All Staff” to cleanup all unnecessary Staff Project assignments in one go. - Have an Intertec TimePro Database Administrator assist with cleaning up your data
Please note that there is a charge for this service but it may be the most efficient method for some clients. In this scenario you can make requests such as “Please disable all active projects in our system that have not had any data recorded in them this year”. Our Intertec TimePro Database Administrator will then code up the necessary scripts and run them against your data to clean it up for you.
Undertaking the above, where relevant to your Intertec TimePro setup, will significantly improve the performance of your Intertec TimePro system.
Other Potential Causes
Intertec TimePro response times should be around the 1 second mark - 2 seconds at most. If you are experiencing slower than expected response times when accessing a new page (or waiting for a page to refresh), consider the following:
- Was Intertec TimePro originally running at a good speed for you? If so perhaps there has been a change within your technical environment - even perhaps something that you are not aware of - eg. an automatic software update from Microsoft or your Virus Software supplier, or your IT team, that is causing you issues. Or perhaps something further upstream such as your Internet Service Provider?
- To get to the bottom of it, the quickest and easiest way is for you to test Intertec TimePro from another environment. Perhaps drop into your local internet café and test access from there, try accessing Intertec TimePro from home (best to use a different computer than what you use at the office), or try ringing up a friend that works somewhere else and asking them what the speed is like (ask them to access our demo rooms as these run on the same server). Note: If possible it would be best to test the performance from other locations using different Internet Service Providers just in case the ISP is where the problem is coming from.
- If response time is still slow, check that you are not accessing Intertec TimePro via a proxy server. Intertec TimePro is a dynamic web application that should be accessed directly and not via a cache. If a proxy server is used, then you may need to add an exception in the proxy server's rules for Intertec TimePro so that it is bypassed and not cached.
- Another area to investigate is that of firewall / virus protection applications on your PC. Temporarily turn all off in case they may be causing the problem.
Other possible but less likely scenarios
There is a data issue on the Internet in general between your location and ours.
The particular time of the day when you are accessing the system and finding it slow (perhaps it is only slow during the time when you enter your work hours and not when we are testing?).
If you have conducted the above tests trying to access Intertec TimePro from other locations and still believe it is a problem at our end could you please email support@timesheets.co.nz with some detailed performance notes as detailed below:
-
E.g. at 4:20 pm local time I logged on as user xxxx, whilst on the Timesheet Tab and clicking the Admin Tab the system took an average of 6 seconds to respond (tried 5 times and the average response was 6 seconds). Doing the same test an hour later and also on other PC's within our office and from other external locations achieved similar results (averaging about 5-6 seconds response time).
In addition, also send us some information on the speed of accessing our Demo Rooms (logon with admin / password), to let us know if you experience the same issue there).
![]()
Q. How does Intertec TimePro Single Sign-On integration work with Microsoft Entra ID?
A: Intertec TimePro Single Sign-On authorisation flow with Microsoft Entra ID:
1. Users access Intertec TimePro by logging in through a dedicated URL using their customer ID.
This URL format ensures secure access:
For example: https://www.timesheets.co.nz/SSO/<CID>/SSOLogin.asp.
2. Retrieval of Tenant ID, Client ID, and Additional Information
After users navigate to the login page with their dedicated URL, the system seamlessly retrieves essential details such as Tenant ID, Client ID, and other necessary information directly from Microsoft Entra ID.
3. Redirecting Users to the Microsoft Login Page
Once the system gathers essential details from Microsoft Entra ID, the login page generates a Redirect URI containing the Tenant ID, Client ID, Scopes, and other necessary information. Users are then seamlessly redirected to the Microsoft login page for authentication.
4. User Authentication and Callback Page
After successfully logging in on the Microsoft page, users are directed back to the callback page via a specified URL: https://www.timesheets.co.nz/SSO/Callback.asp. This callback page retrieves the AuthorizationCode and proceeds to send a POST request to Entra ID in order to obtain an access token.
5. Access Token Validation and Email Extraction
Once the access token is acquired, the callback page validates it and extracts the email value. This extracted value serves as a means to authenticate the user and determine the continuation of the login process.
6. Validation of Email and Customer ID on Callback Page
In the final step, the callback page verifies the email and customer ID to decide on the next course of action, whether it involves logging the user in or rejecting the login attempt.
![]()
Q. How do I setup Intertec TimePro Single Sign-On integration with Microsoft Entra ID?
A: Create an Application Registration for Intertec TimePro in Microsoft Entra ID
While setting up the Intertec TimePro application registration in Microsoft Entra ID, gather the following essential information for future reference:
- Client ID
- Tenant ID
- Client secret value
Follow these steps to register the Intertec TimePro application:
- Sign in to the Azure Portal.
- Navigate to Microsoft Entra ID from the portal menu.
- Select "App registrations" > "New registration" from the left navigation.
- On the "Register an application" page, provide a name for your app registration, such as "Intertec TimePro".
- Choose the supported account types that can access this application.
- Under "Redirect URIs", select "Web" for platform and set the App-URL to https://www.timesheets.co.nz/SSO/Callback.asp.
- Click "Register".
After creating the app registration, make sure to note down the Client (Application) ID and the Tenant (Directory) ID for future use.
To generate a client secret:
- Go to "Certificates & secrets" > "Client secrets" > "New client secret" from the left navigation.
- Provide a description and expiration for the client secret, then click "Add".
- Copy down the value from the "Value" field. Please note that it won't be visible again once you leave this page.
For security reasons contact us for next step instructions.
![]()
Q. How does Intertec TimePro's Single Sign-On (SSO) implementation meet level 1 Essential 8 Compliance Requirements?
A: The Single Sign-On (SSO) implementation that Intertec TimePro utilises based on using an Azure App Registration Secret Key in order to allow Microsoft 365 tenancies (Microsoft Entra Identity) to enforce Multi Factor Authentication (MFA) satisfies the Level 1 Essential Eight requirements for the following ISM controls:
ISM-1679
Multi-factor authentication is used to authenticate users to third-party online services that process, store or communicate their organisation’s sensitive data.
ISM-1680
Multi-factor authentication (where available) is used to authenticate users to third-party online services that process, store or communicate their organisation’s non-sensitive data.
ISM-1893
Multi-factor authentication is used to authenticate users to third-party online customer services that process, store or communicate their organisation’s sensitive customer data.
A user of this service may also layer their own Conditional Access phish resistant policies to achieve Level 2 MFA controls:
ISM-1873
Multi-factor authentication used for authenticating customers of online customer services provides a phishing-resistant option.
![]()
Time entry, editing timesheets, recording leave, recording expenses
Q: Does Intertec TimePro support alternative time entry formats?
A: Intertec TimePro can be configured to support a simple entry format of just the hours worked or to force the end-user to enter both the start and finish times and then automatically calculate the number of hours worked.
![]()
Q: How do I change the starting day of the week in my timesheets, eg. changing from Mon-Sun to Wed-Tue?
A: Intertec TimePro recognises that not all organisations operate Monday-Sunday. If your business timeframes are different, then you can change your timesheet period as appropriate by editing the Period Base Date in the Settings tab, under Period Control in Intertec TimePro.
![]()
Q: How do I edit a timesheet that has already been submitted?
A: A timesheet is considered submitted once a User clicks on the “Submit Timesheet” button. To ensure data integrity, especially post invoicing, a completed timesheet can only be unlocked by the system administrator or authorising manager (via the rejection of timesheet approval) if this option has been enabled. If you need to edit a submitted timesheet, contact your Intertec TimePro Administrator.
![]()
Q: Can users review their timesheets at any stage?
A: Yes - the administrator can set the number of previous and future periods they want normal users to be able to view. Users can do this via the View Timesheet option, printing off their Timesheets or via the Staff Time Tracking Report.
![]()
Q: Can I record leave and holiday times in Intertec TimePro?
A: Yes - there are many different ways of achieving this - one way is to set up a Project for each type of leave you want to track, eg Projects such as:
Your Company Name - Holiday Leave
Your Company Name - Sick Leave
Your Company Name - Public Holidays
The most efficient method of setting this up is to create one Project only, attach all the staff required to that Project and then Copy the Project to create your second and so on (saves you having to create Staff Project records for the subsequent Projects).
Another option would be to use Global or Project Specific Tasks for the leave types and record them against an Internal Project - eg Your Company Name Internal or Your Company Name Leave.
![]()
Q: Intertec TimePro won't let me enter 24:00 as a finish time. Is there a fix or workaround for this?
A: Yes - in your Intertec TimePro settings ensure that "Allow Time Entry Past Midnight" is turned on. This will allow you to enter 00:00 for midnight (or later). Please note that 24:00 is not a valid time so it can't be entered (after 23:59, the next time is 00:00).
![]()
Q: Can Intertec TimePro be used as a diary or scheduling tool?
A: Yes - the administrator can set the number of forward periods that are available for Users to record entries against and thus the ability to schedule work.
![]()
Q: Can Users send their timesheets via email?
A: Yes, timesheets can be included in the body of email messages by copying and pasting the timesheet from Intertec TimePro into the email. Note: you should select the required timesheet text with the mouse instead of using CTRL+A (PC) or COMMAND+A (Mac). Another method, which is quite a professional approach, is to print the timesheet to a PDF file and then send the file as an email attachment. There are a number of free applications such as CutePDF Writer and Primo PDF which allow you to do this.
Some web browsers allow users to "send a web page via email". Intertec TimePro is not designed to do work with this function, as Intertec TimePro web pages are created dynamically. We recommend that Users use one of the above methods if they would like to send their timesheet via email.
![]()
Q: Can I record project expenses in Intertec TimePro, eg. meals, travel, equipment etc?
A: Yes - ensure you have Expense Tracking turned on in the Intertec TimePro Configuration settings (Settings tab). For more information look up "Expense Tracking Setup" In the Intertec TimePro Online Help Guide.
![]()
Q: How do I compress the file size of my expense receipt images on my smartphone?
A: Intertec TimePro has a file upload size limit of 256kb - generally speaking you will be required to compress the photo before uploading. Below are instructions to do so on Apple and Android smartphones:
Apple
- Install the free app called ImageResize
- Launch the ImageResize app, then touch the camera icon (top right).
- Take a photo of the receipt, the default settings for the size and compression work well.
- Touch the Upload icon (very top right) and touch Save Image.
Now you have a photo of your receipt which is within the size restriction, now you can go back to Intertec TimePro and upload the photo.
Android
- Install the free app called Droid Scan Lite (by Trans-code Design)
The default settings are functional; the medium-resolution setting gives good results. The settings also allow you to choose grey-scale images. - On the Intertec TimePro Expense entry screen, touch Upload or Replace, then Browse. In the File Upload dialogue which pops up, choose Droid Scan Lite.
- Touch the Menu button and choose to Capture. Compose and take a picture of the document, then use the Back button to return to the Droid Scan screen.
- You now have the opportunity to slide the corners of the selection rectangle to the corners of the document. This will trim the image and correct the perspective to a rectangular shape. Touch Next.
- Choose the document size which is appropriate from the dropdown list - it's usually OK to take the suggestion given by the software. Touch Done.
- Now select your new scan on the screen by touching it, and touch Pick. Choose JPG as the format, and you're done; it's selected within Intertec TimePro and ready to upload.
Now you have a PDF of your receipt which is within the size restriction, now you can go back to Intertec TimePro and upload the PDF.
![]()
Q: How do I compress the file size of my expense receipt images on my computer?
A: Intertec TimePro has a file upload size limit of 256kb - generally speaking you will be required to compress the photo before uploading. Below are instructions to do so on a Windows and Mac computers:
Windows
- Open the folder that contains the pictures you want to resize
- In Thumbnail view, right-click on the picture you want to resize, and then click Resize Picture
- In the Resize Pictures dialog box, click the Small size and then click OK
- The original image file will remain, but a new, resized file will appear in the same folder
Now you have a photo of your receipt which is within the size restriction, now you can go back to Intertec TimePro and upload the photo.
Mac
- Open the image in Preview
- Choose Tools > Adjust Size
- Use the Fit Into dialog box, select 800x600 and click ok
- Finally Save the image
Now you have a photo of your receipt which is within the size restriction, now you can go back to Intertec TimePro and upload the photo.
![]()
Q: Can I record project expenses in Intertec TimePro, eg. meals, travel, equipment etc?
A: Yes - ensure you have Expense Tracking turned on in the Intertec TimePro Configuration settings (Settings tab). For more information look up "Expense Tracking Setup" In the Intertec TimePro Online Help Guide.
![]()
Managing Intertec TimePro users
Q: How does user licencing work? Does the Intertec TimePro user licence allow us to activate certain users at different times, depending on who are currently working on jobs and projects
A: The number of users licenced for your Intertec TimePro web timesheets system is based on the number of Staff records you have which are Active. An Active Staff record allows the User to login to Intertec TimePro and record times. Once a Staff record is set to Disabled, then the User no longer has access to Intertec TimePro.
For example, you may have 25 staff, but only 20 of them are working on projects at any one time. In this case, you only need a 20-user licence, but maintain staff records for 25 staff, keeping 5 Staff records Disabled (which basically means they can't enter time until they are made Active). You then set the Staff records to Active or Disabled, depending on who needs to record times on projects.
![]()
Q: We currently have a lot of contractors who may work one time period but not the next. Is there a way we can lock the timesheet for specific staff if we know they are not working that period?
A: Yes - the best way to achieve this would be to have the staff member (or Administrator) enter 0 hours against a Project during the week and then press the Submit Timesheet button - this effectively then locks the timesheet. Please note that you will need to enable “Allow Entry of Zero Hours” in the system configuration for the staff member or Administrator to record 0 hours in that period.
![]()
Q: We have 3 offices, A, B, C and we would like to be able to 'group' staff by office. For example Office A would like to be able to print out a total billable time for all their employees across all their projects. Is this possible?
A: Yes – there are a number of different options available:
- We can set up three separate Intertec TimePro systems for you with identifiers like OFFA, OFFB and OFFB for each of the three offices. However, if you need consolidated reporting across the 3 groups then you would need to do a data export from each system and bring the data into MS Excel, MS Access or other spreadsheet/database package for further processing. TimPro has a very good data export facility so this is quite straightforward.
- Another option is to use just one Intertec TimePro system but to use the Staff Type to differentiate between the different groups. You can choose to print timesheets by Staff Type.
- The last option is to use another field on the Staff Table such as the Reference field to store which group your staff belong to. With this approach there are no in-built reports which report by Reference field but we can create a custom report for you (pretty simple) or you can export the data to MS Excel, MS Access.
![]()
Q: Can I restrict the Tasks staff see on a certain project?
A: Yes you can use the Resource Filter:
You can specify a Resource Filter for each Staff member in the staff list. The Resource Filter which you specify here is used as part of the "Project-specific Tasks" functionality within Intertec TimePro, which is enabled via the Configuration Settings. This field is matched against the Resource List field on the Project Task Add / Update screen. A typical Resource Filter would contain a shorthand notation for a Staff member's name such as their initials, e.g. JB.
When Staff members are entering their time and they select a Project that has Tasks specific to it, then they are presented with a list of only Project Tasks whose Resource List field contains their own Resource Filter. This enables you to limit the Project-specific Tasks that are displayed to only those which are relevant to the Staff member.
Note: If the Resource Filter is left empty then the Staff member will be shown all Project Tasks.
If the Project Tasks "Resource List" field is empty for a particular Task, then that Task is deemed to be common to all Staff on that Project and will be displayed for selection.
![]()
Q: The system seems to keep timesheet approvers (Managers) separate from timesheet users (Staff). Am I right to assume that if someone is a Manager, but must also complete timesheets (Staff) they need to have 2 IDs - one as a Staff member, and one as a Manager?
A: Yes - any person who needs to authorise timesheets (Manager) and also record their time (Staff) is set up in both the Managers and Staff records (although note that only Staff have a logon ID - Managers do not logon to the system). There are a couple of reasons behind this - the most fundamental is that we didn't want to inconvenience managers authorising timesheets with logging on to the system, as it just gets "too hard" for them.
This is why an email is sent which displays the timesheet to authorise. We also wanted to keep managers separate as they may often be people outside of your own organisation who may need to authorise timesheets - for example if you had a staff member working at a client site you could set that client up as a "manager" to authorise the timesheet. Managers are also not included in your licence count.
![]()
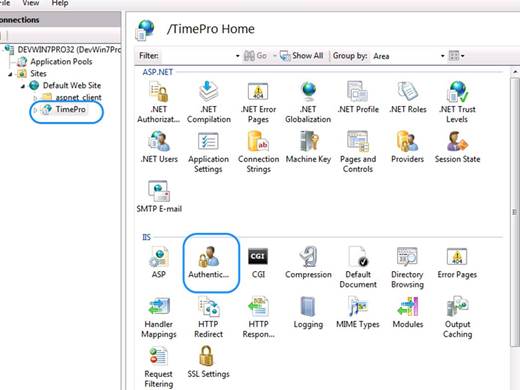
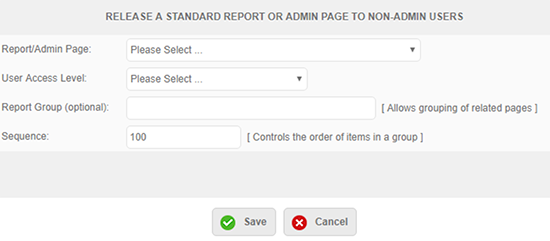
Q: How to release a report to a non-admin user?
A: You can release any page or report in Intertec TimePro to a non-admin user. Prior to doing this ensure you are comfortable with the information that the Staff member can see. Releasing a report will enable the Staff member to see the same information as a administrator would.
- Go to Settings | Custom Reports
- Click Release Standard Page.
- From Report/Admin Page: choose the page or report you wish to release to the user.
- User Access Level: Allows you to choose either the person for an individual or a staff type for a group of people.
- The Report Group is only if you are releasing many reports/pages and would like to group them under headings. For example, any reports relating to projects could be set under Project Reports. This is optional.
- The Sequence is the order it appears on the screen.
- Each time you release a new report change the sequence number. It will give you a message if you forget to do this.
- Once you release a Report to a non admin user, they will be able to access it by going to Reports | Custom.
If you have any further questions or if you would like some assistance with it please let me know.
![]()
Charge and cost rates, non-billable projects
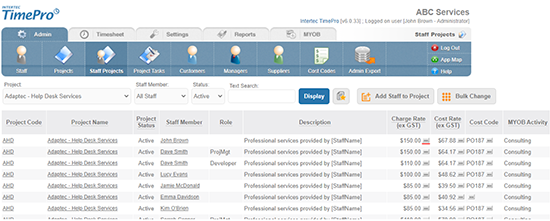
Q: How do we apply different rates for work on different Projects?
A: Rates are defined when you assign a person to a project (Staff Projects). This gives you a great deal of flexibility as a Staff can have different rates for different Projects that they work on. Intertec TimePro also allows staff to have multiple rates on one Project (eg a person may be a Project Manager and an Analyst on one project and have different rates for the two roles).
To do this, you need to use the Role field to define the different roles for the Staff and assign a different charge/cost rate for each Role. You’ll need to have the “Staff May Have Multiple Roles” configuration setting enabled in order to do this.
![]()
Q: Can we mark work as non-billable ie. still pay contractors but not charge the client?
A: Yes - set the Project to "Non-chargeable" and you could also set the charge rate to $0. This would allow you to still create Purchase Invoices from Intertec TimePro for this contractor but not charge any client.
![]()
Q: How do I change rates in Intertec TimePro ?
A: In relation to rates there are 3 ways to change a rate. There are all performed under Admin | Staff Projects.
1. Standard Edit (available via or )
- What: This option modifies the selected record directly, affecting all time and expense records already attached to the record as well as all new time and expense records entered. Note: You can use the Drill Down function to check which Time and Expense records are linked to the Staff Project record before changing it.
- When: You will normally use this method if you are correcting a mistake in the rates or assigning rates for the first time.
- Result: This will change the rates for all existing time records attached to this Staff Project record. Any future time records entered will also be recorded against this same record and receive the new rates.
2: Historical-Preservation Edit (available via only)
- What: This option disables the selected Staff Project record, thus preserving the charge/cost rates attached to existing time records, and creates a new Staff Project record containing the new values, to which all future time and expense records will be associated. Note: You can use the Drill Down function to check which Time and Expense records are linked to the Staff Project record before changing it.
- When: You will normally use this method if you need to apply a change of rates midway during a project. This method creates another Staff Project record to store the new rates in.
- Result: The new rates you specify will apply to future time records only. Any existing time records will still be attached to the previous Staff Project record and will not receive the new rates.
In summary, with the Historical-Preservation Edit method, rates are preserved for all existing time records, as the previous Staff Project record is marked as Disabled. A new set of values is stored in a new Staff Project record and marked Active. All time records created after this point in time will reference the new Staff Project record.
3. Bulk Change (Change a rate from a particular date)
To change a rate from a particular day use the Bulk Change feature.
The most important thing to remember when you are using this feature is that whatever is listed in the staff projects screen will be affected by the bulk change. It is crucial to filter to the records which you would like to change. For example if John’s rate is changing for all projects which currently have a rate of $140.00 to a rate of $150.00 then use the following steps:
- Go to Admin | Staff Projects
- Choose John from the staff dropdown
- Enter $140.00 into the text search
- Click ‘Display’
- Ensure that you are happy with the records listed as the bulk change will affect them all
- If correct click on the button ‘Bulk Change’
- Click the ‘Disable Normal User Access’ button.
- Click the ‘Bulk Change’ button.
- From Step 1, enter a date which the new rate should be effective from.
- From Step 2, enter the new rate either in the ‘Charge Rate’ box or the ‘Cost Rate’ box or both.
- Next click ‘Perform Bulk Change’
- The next screen is a summary of the records which were affected
- If you are finished using the Bulk Change feature then click on the button ‘Enable Normal User Access’, if you would like to continue to update the rates then click on the button which says ‘Return to Staff Projects Screen’.
![]()
Security and back-up
Q: Is the data I enter in Intertec TimePro safely and securely backed up?
A: Intertec TimePro is hosted at WebCentral (www.webcentral.com.au), Australia's largest and most experienced web hosting company. WebCentral servers are mounted in lockable 19" racks, which are located within a secure data centre - accessible only by authorized staff.
Web servers are backed up incrementally daily, weekly and monthly and backup tapes are rotated offsite on a regular basis. The data centre is manned 24 x 7 by trained staff and features motion detectors, alarms and fire detection and suppression systems. WebCentral's secure Brisbane data centre is also located within a high level building to prevent flooding.
Each website is self-contained with strict file system permissions designed to ensure that external administrative access is available only to the website owner. WebCentral’s Senior Technicians and System Engineers are engaged in an ongoing basis in the task of reviewing and testing released Service Packs and Hot fixes for all managed applications installed on their shared servers. Regular security auditing across the enterprise including security patch levels and known vulnerability testing ensure that all servers are maintained to our approved security levels.
![]()
Q: Is the information that I enter into Intertec TimePro both safe and secure?
A: Intertec TimePro users can only access the software with a valid Company ID, UserName and Password. The Company ID is a unique identifier which is set up for you when you first subscribe to use the application. All data is held in your own partitioned database schema created on Servers protected by un-interruptible power supplies and backed up nightly for the purpose of disaster recovery.
Intertec TimePro application is protected with the latest in SSL security - business identity authentication and strong 256-bit encryption with a 2048-bit root - technical terminology giving you peace of mind that the application is communicating securely over the Internet.
![]()
Q: What is the recommended approach for Backup/Recovery of Intertec TimePro In-House?
A: There are two main areas to consider when backing up your Intertec TimePro In-House system and database:
1) Intertec TimePro Application:
It is recommended that you add the directory "C:\Program Files\Intertec TimePro" (or equivalent installed location) to your normal file backup for the web server that Intertec TimePro is installed on.
Note: adding Intertec TimePro to your backups, will not be required if you already backup the "Program Files" directory as it will automatically be included in your backups. All Intertec TimePro related files (except the database) are stored in this one location and so that is all that is needed to be backed up.
2) SQLServer Database:
It is recommended that the Intertec TimePro database be added to your standard SQLServer database backup maintenance plan and backed up as per of your other SQLServer databases.
Disaster Recovery
In the case where you have a complete unrecoverable server failure and need to get Intertec TimePro up and running as soon as possible, then you simply use the installation software to install Intertec TimePro on another working server including any patches applied since the original installation. This will then give you a working Intertec TimePro system with an empty database. Your SQLServer administrator can then restore the Intertec TimePro database from backups to restore the data.
The only data that is stored outside of the database that may then need to be restored are any custom templates or reports that may have been written for you, and any graphic signature files - all of which are all stored in the following location:
"C:\Program Files\Intertec TimePro\Web\TPXX\User\TP_" were ‘XX’ refers to the installed version of Intertec TimePro.
This directory could then be copied over the equivalent directory in the new install from your backups if needed.
Similar information to the above is also covered in a little more detail in our Intertec TimePro FAQ which you may like to refer to: How do I move my Intertec TimePro In-House installation to another server?
![]()
Exporting Intertec TimePro data
Q: Can the information I enter in Intertec TimePro be transferred to other programs?
A: Yes, the data you enter in Intertec TimePro can be exported as Comma Separated Format (CSV), Tab Delimited or HTML. This is then easily imported into other applications such as Microsoft Excel. Intertec TimePro also has optional MYOB and Quickbooks Integration Modules designed to streamline the process of creating sales invoices and service purchases using the time records entered into Intertec TimePro.
![]()
MYOB Integration
Q: If multiple people are working for one Customer, will they all appear on the one invoice?
A: Intertec TimePro’s MYOB and QuickBooks Accounting Integration modules support both single and multiple invoice options. Invoices can be generated per Customer, per Customer and Project, per Customer and Project and Job etc. In the example above where you have multiple staff working for one Customer, then to have them appear as line items on a single invoice for that Customer, you would most likely set the invoice to be generated per Customer.
If however the staff are working across multiple Projects for that same Customer then you may prefer to have separate invoices generated per Customer and Project. Changing how invoices are generated is simply a matter of choosing the relevant option from a drop down at the time of generating the invoices. The value you select is retained as the default for when you next generate invoices or you can override this with an alternative option at the time.
![]()
Q: When doing a Time Billing Sales Invoice export, is there any way you can export information contained in the Description of Tasks Undertaken field to the Notes field in MYOB instead of just having the Staff/Project description exported to the Notes field?
A: No, not when you are doing a Sales Invoice Export from Intertec TimePro to MYOB. The notes field in MYOB is populated from the "Staff/Projects" Description during the MYOB export. Normally, we recommended that you store something like "Professional Services provided by John Smith" in this field in Intertec TimePro, so this is what you will then see in your MYOB invoice.
If your Customers require more information about work undertaken in the invoice, you can use the Timesheet Batch-Print facility in Intertec TimePro to print out a detailed timesheet to send out with your customer’s invoice - this will show the detailed tasks undertaken. (You can customise the details shown on the Timesheet by choosing a different Print Template - see the Projects screen).
The invoice contains a summary of the work undertaken (ie generally one line item for each person working on the project). The timesheets are then printed off via the Batch-Print facility that corresponds to the invoice run (do the MYOB export first before running the Batch Print).
If you would like to include the Description of Tasks Undertaken in the Notes field of your MYOB Invoice, then you will need to export time records as Activity Slips from Intertec TimePro, and import them into MYOB. In MYOB, you then process the imported Activity Slips for time billing. More information about doing this is available below.
![]()
Q: How do I integrate Intertec TimePro with MYOB Activity Slips for payroll integration in MYOB?
A: If you are using Intertec TimePro with the MYOB Integration Module, time records exported as MYOB Activity Slips may be marked for Payroll Integration against a Payroll Category. The Payroll Category can be derived from a range of values or entered as free text (free text defaults as Base Hourly). To import Activity Slips for payroll integration, you will need to set your MYOB system up as follows:
In MYOB:
- Set up your MYOB Preferences to ensure that the option for "I Use Timesheets for Time Billing and Payroll" is checked:
- Access the Employee Card and, for each employee, define their settings as follows (the example below is for an employee with a payroll category of Base Hourly. Your employee may have a number of payroll categories, so this will need to be done for each payroll category) :
- Set Standard Pay for Base Hourly Category to "0":
- Check that Wages details are associated with the Base Hourly Payroll Category:
In Intertec TimePro:
- When undertaking an Activity Slips export, make sure that the Activity Slips are marked for Payroll Integration and that you enter the correct MYOB Payroll Category name for integration with the Activity Slips.
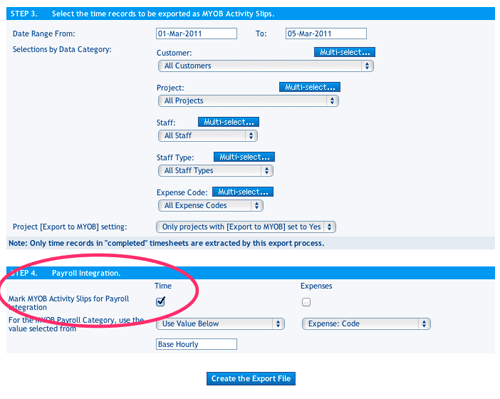
- Conduct the export from Intertec TimePro and import to MYOB as usual for payroll processing. You will note that the Activity Slips now register as hours recorded as Timesheet Hours in the MYOB screen capture below:
- If you are unfamiliar with how to setup MYOB using Activity Slips for payroll integration then we recommend you solicit the services of a MYOB Certified Consultant to assist you with the setup and configuration of MYOB to meet your payroll integration requirements.
![]()
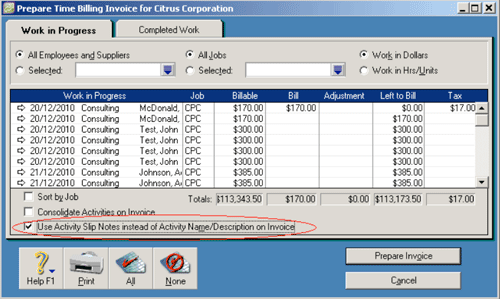
Q: How do I show the notes carried over from the Intertec TimePro Activity Slips Export on an invoice rather than the Activity ID?
A: When preparing invoices from imported Activity Slips, tick the option which reads “Use Activity Slip Notes instead of Activity Name/Description on Invoice”
![]()
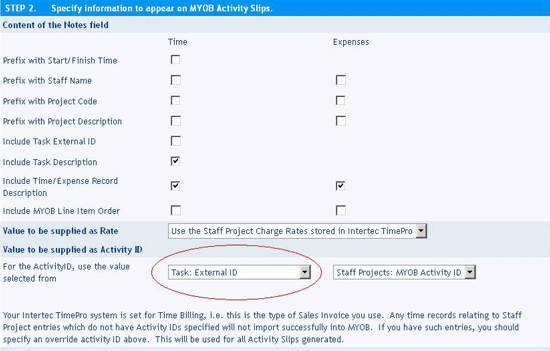
Q: I would like to associate the Activity ID with the Task rather than the Staff Project. Is this possible?
A: Yes, Intertec TimePro is very flexible in this regard and you can derive the Activity ID using any of the fields below:
- MYOB Job (Stored in the Projects screen)
- Cost Code (Stored in the Staff Projects screen)
- MYOB Activity ID (Stored in the Staff Projects screen)
- Role (Stored in the Staff Projects screen)
- Reference (Stored in the Staff screen)
- Task Description (Stored in the Task Screen)
- Task External ID(Stored in the Task Screen)
- Or you may specify an Activity ID
When you are exporting either Sale Summary invoices or Activity Slips you can specify which field you would like to derive the Activity ID from.
Note: If you are MYOB Activity Slips Export option then you can also derive the MYOB Job or the Payroll Category from the fields above.
![]()
Q: Can I import expenses into MYOB?
A: There is currently no function in MYOB to import expenses. Below is an explanation of how you can import expenses into MYOB for invoicing and payroll using Intertec TimePro’s Activity Slips Export facility.
Invoicing expenses
- Expenses can be exported from Intertec TimePro using the Activity Slips Export facility. During the process of generating the Activity Slips export file, the program will map the amount of the expense to the Units field and the Rate field is set to 1.
- Note: when you view the expense as a line item on the invoice in MYOB, the amount is calculated correctly and appears under the ‘hours’ field.
Processing expenses for payroll
- As well as being useful for invoicing purposes, activity slips can also be used in the payroll process. To achieve this set up a payroll category in MYOB specifically for expenses with an hourly rate set to 1. You will need to specify this payroll category during the export of the expenses through Intertec TimePro.
- Note: when you process the staff payroll in MYOB the expense amount appears in the Hours field with a rate of 1.
![]()
Q: How to import activity slips from Intertec TimePro to MYOB with a combination of chargeable and non-chargeable tasks?
A: Integrating with MYOB activity slips with a combination of chargeable and non-chargeable tasks can be achieved in the following way.
In Intertec TimePro
Project Tasks or Global tasks can be used in this scenario.
- Edit each task and enter the Activity ID in the External ID field and Save.
- Go to the MYOB tab and click MYOB Export.
- Next click MYOB Activity Slips.
- Choose “Task: External ID” from the option “Value to be supplied as Activity ID” (see screen capture below).
- The other settings can be set as you would normally have set them.
- Export the file
In MYOB
MYOB Activities are set up under Lists and Activities.
When setting up your activities in MYOB, for any activity which is chargeable and the rate is stored in Intertec TimePro use the following settings:
Type: Hourly
Status: Chargeable
Rate: Use Employee Billing Rate
Note: If you would like to keep the rates in MYOB, set the rate to “Use Activity Rate” .
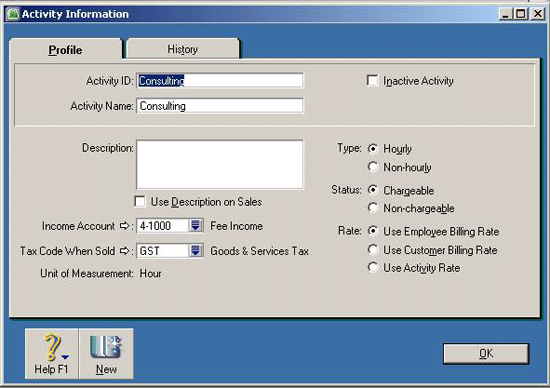
For activities which are non chargeable please use the following settings:
Type: Hourly
Status: Non-Chargeable
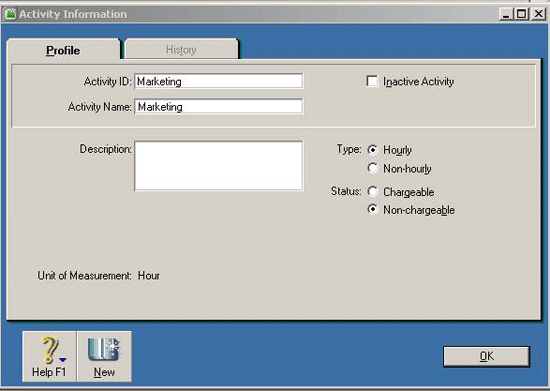
Import the activity slips as normal.
For all non-chargeable activities you will get a “Warning 207: Activity is non-chargeable; rate ignored.”
The records will still be imported but with a charge rate of 0.
![]()
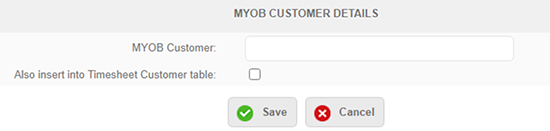
Q: How to change customer names?
A: To change a MYOB Customer Name:
- Go to MYOB | MYOB Customers.
- Click ‘Add New Customer’.
- Type the correct name in the MYOB Customer box.
- Untick the box ‘Also insert into Timesheet Customer table’ and click ‘Save’.
- Next go to Admin | Customers.
- Find the Customer you wish to change and use the yellow pen to edit the record.
- Enter the correct name in the Name field and choose the correct MYOB name from the MYOB Name drop-down.
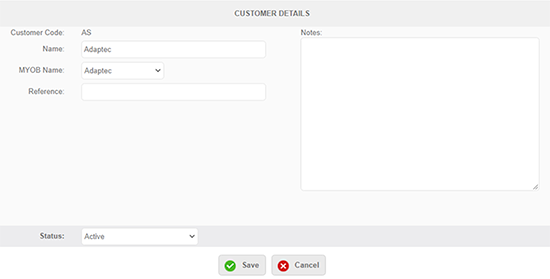
- You can now go back to the MYOB tab and MYOB Customers and delete the incorrect name
QuickBooks Integration
Q: How do I connect the Intertec QuickBooks Transaction Importer (QBTI) to a different QuickBooks file?
A: Open the Importer and click ‘Connection’. Click ‘Disconnect’. Next open QuickBooks and open the file you would like to connect to. In the importer click ‘Connect’ and it should connect to the file open in QuickBooks.
![]()
Q: I would like to associate the Service Item with the Task rather than the Staff Project. Is this possible?
A: Yes, Intertec TimePro is very flexible in this regard and you can derive the Service Item using any of the fields below:
- QuickBooks Job (Stored in the Projects screen)
- Cost Code (Stored in the Staff Projects screen)
- QuickBooks Service Item (Stored in the Staff Projects screen)
- Role (Stored in the Staff Projects screen)
- Reference (Stored in the Staff screen)
- Task Description (Stored in the Task Screen)
- Task External ID(Stored in the Task Screen)
- Or you may specify a QuickBooks Service Item
When you are exporting either QuickBooks Invoices or QuickBooks Timesheets you can specify which field you would like to derive the Service Item from.
Note: If you are using the QuickBooks Timesheet Export option then you can also derive the QuickBooks job or the Payroll Category from the fields above.
![]()
Q: How to change customer names?
A: To change a QuickBooks Customer Name:
- Go to QuickBooks | QuickBooks Customers.
- Click ‘Add New Customer’.
- Type the correct name in the QuickBooks Customer box.
- Untick the box ‘Also insert into Timesheet Customer table’ and click ‘Save’.
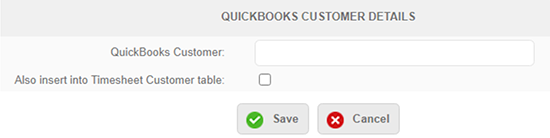
- Next go to Admin | Customers.
- Find the Customer you wish to change and use the yellow pen to edit the record.
- Enter the correct name in the Name field and choose the correct QuickBooks name from the QuickBooks Name drop-down.
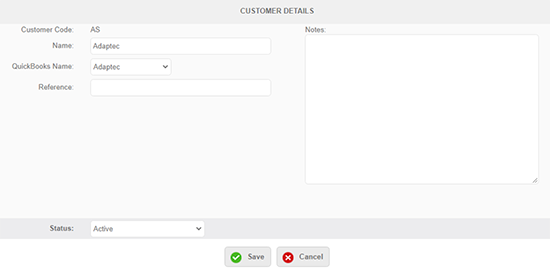
- You can now go back to the QuickBooks tab and QuickBooks Customers and delete the incorrect name.
![]()
Xero Integration
Q: How to change customer names?
A: To change a Xero Customer Name:
- Go to Xero | Xero Customers.
- Click ‘Add New Customer’.
- Type the correct name in the Xero Customer box.
- Untick the box ‘Also insert into Timesheet Customer table’ and click ‘Save’.
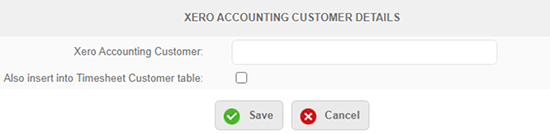
- Next go to Admin | Customers.
- Find the Customer you wish to change and use the yellow pen to edit the record.
- Enter the correct name in the Name field and choose the correct Xero name from the Xero Name drop-down.
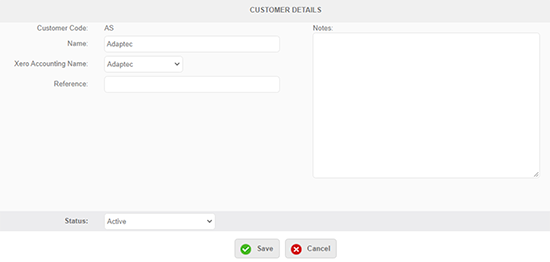
- You can now go back to the Xero tab and Xero Customers and delete the incorrect name.
![]()
Support and training
Q: What kind of technical support can I expect?
A: You can contact The Intertec TimePro Support Centre on +61 (8) 9286 3911 or email us at support@timesheets.co.nz
Support and maintenance is included with the Intertec TimePro Hosted package.
The Intertec TimePro In-House package includes the first year's annual support and maintenance fee. On-going S&M is optional at 20% of the purchase price.
Upgrades are included in the Intertec TimePro Hosted package. Intertec TimePro In-House clients will also receive upgrades if they have support and maintenance cover.
![]()
Q: What training tools are available to provide the team on basic operating functionality?
A: No formal training is required for end users. Administrators should read the Online Intertec TimePro Setup Guide available when you have logged into the system.
![]()
Customising Intertec TimePro
Q: The standard Intertec TimePro reports don't give me the data that I want. Can I have a custom report created and, if so, what is the cost to have a custom report written?
A: There are two options in this scenario.
Option 1: You can create and save a custom export using Intertec TimePro’s built in Export Facility. This feature lets you choose the fields to extract, filter the data and export it to HTML, CSV or Tab Delimited file. You can then manipulate the data in the output file using a software tool such as Microsoft Excel. This feature can be found on the Timesheet screen by clicking on Data Export.
Option 2: Whether to apply specific business rules, or to report specific information, Intertec TimePro Custom Reports can be created for your business.
As the complexity of the reports are often not known until we examine your requirements, a formal analysis of your Custom Report requirements is undertaken, from which we will prepare a written requirements specification and quote for your approval. The length of this analysis depends on the complexity of the report and involves further discussions with you to help us identify the way you expect the report to work. The analysis usually takes a minimum of 2 hours at $170/hour exc GST.
Upon your approval of the requirements specification and quote, we will then undertake to construct the report and deploy it to your Intertec TimePro account under the Reports > Custom Reports option.
Please note that minor changes to the default reports in Intertec TimePro, which take no more than 1 to 2 hours to construct, eg. the insertion of a company logo into the report, can usually be quoted on a fixed-price.
Custom reports are analysed, developed and tested using our Custom Report Methodology. As a guide, a typical custom report generally requires between 4 to 8 hours work, with more complex reports requiring 1 to 2 plus days work. All custom report consulting work is charged at $170/hour exc GST.
The Intertec TimePro Custom Report Methodology
- Analysis – An analysis of your custom report requirements. Deliverable: A requirements specification and quote for your sign-off.
- Development – Upon your approval of the requirements specification and quote, we develop your custom report as per the specifications. Deliverable: Completed custom report.
- User-acceptance testing – You test the custom report to make sure that it functions as described in the requirements specification. Deliverable: Sign-off on the custom report.
- Deployment – The custom report is deployed to your Intertec TimePro hosted service account or In-House solution.
If you require a custom report produced for your Intertec TimePro account, please contact us.
![]()
Q: Can I include my company logo in Intertec TimePro, eg. I’d like to have the company logo on the timesheets.
A: There are two options available with regards to branding Intertec TimePro reports with your company logo.
Option 1: You can have your company logo on your Intertec TimePro system (where it will be co-branded in the style of ‘Your Company Name – Powered by Intertec TimePro), and the logo will appear on all screens and reports. There is a fixed fee of $750 (exc GST) for this service which covers logo design, implementation and deployment.
Below is an example of a co-branded system based on the Citrus - Orange Scheme.
Note: Co-branding is based on one of the out-of-box colour schemes you choose for your setup. if you have specific requirements for a completely new colour scheme to suit your business then email/contact us to discuss your needs.
Option 2: Logo Integration with Printed Reports and Timesheets
Email us a high-resolution image of your corporate logo. Your logo will appear on all printed versions of the Reports and Timesheets. Fee is once off $375 ex GST.
![]()
Q: How do I add custom timesheet templates to my Intertec TimePro In-House installation?
A: Custom project timesheet templates are usually provided by us in .ZIP file format. You need to have added the templates to your Intertec TimePro In-House installation before they are available for use.
- Extract the contents of the .ZIP file to your computer. This will normally expand to a folder called TP_ which contains a number of files and sub-folders. The contents of this folder mirrors the TP_ folder in your Intertec TimePro In-House installation, which is located, by default, in /Intertec TimePro/Web/TP52/User/TP_/ .
- Copy the files to their respective locations in the Intertec TimePro In-House installation on your server.
- Access Intertec TimePro In-House and go to the 'Settings' tab. Select the 'Template' icon.
- Click 'Add Template'.
- In the template field, enter the entire filename of the custom template .ASP file. For example, if the filename is 'ABCServices_Generic.asp', enter this in the field.
- Using the Key: drop down menu, select the appropriate key value for this template (we will inform you of the key value to use).
- Save the new template.
- Next, you need to assign the new template to Projects in your Intertec TimePro system. To do this, view the Projects listing (Admin > Projects), and edit the relevant records, assigning this to the new timesheet template.
- Test that the new template is working.
![]()
A: Intertec offers a Web Service which allows for data to be extracted as an XML data stream. The mechanism is as follows.
- The user invokes a specific URL and passes required parameters in a
- The user receives an XML stream which specifies error information or the required data.
The report will be invoked as a Microsoft .NET ASMX Web Service. This uses the SOAP protocol. The output will be strictly an XML data stream as described above. The interface parameters can be obtained from the ASMX page itself.
User Requirements to Retrieve Data
The facility described above requires client software which is capable of accessing the URL agreed, communicating using standard SOAP 1.1 or 1.2 protocols. The details are obtainable from the page invoked by the URL in the standard discovery format. The results will be returned as an XML stream. The client software is responsible for invoking the request, retrieving the data and disposing of it as desired, for example saving a CSV file for viewing by a spreadsheet, or storing the data into a database.
Your development team can get the WSDL from https://www.timesheets.co.nz/SQLJobs.asmx?WSDL
Intertec TimePro Web Service URL:
https://www.timesheets.co.nz/TPAPI/TPWebService.asmx
Client Name: Intertec Example
ClientAccessToken : 2DF03289-2L26-472N-9P68-0M51W57214197 (Sample, not valid)
Security Tokens
Time Record Extract : F393CF98-D51C-44F9-9L9B-L48255M547B9 (Sample, not valid)
Parameters
ClientParameters : DateFrom=yyyy-mm-dd~DateTo=yyyy-mm-dd
Limitations
One successful run per day.
Please note that if you submit a job which is rejected, you will be able to correct the problem and rerun immediately.
Maximum output is 10,000 rows.
Note: These limits are in place to ensure that the day to day performance of Intertec TimePro is not adversely impacted by Web Service calls.
These limits may be relaxed for a short time during testing, to allow more frequent runs.
Sample Program
As an aid to development, we offer a sample program which calls the Intertec TimePro Web Service.
There is an executable in the bin folder, which can simply be double-clicked on a system with Microsoft’s .NET Framework 4.6.2 or later.
The (VB.NET) source code for this is also included – the function which does this is right at the beginning of the code file.
If you run the program, you will be presented with a dialogue which offers the required input fields. Simply enter the ClientAccessToken and SecurityToken values provided above and the ClientParameters in the format specified, then press the Invoke Web Service button, and the response returned will be displayed in the Results box at the bottom of the screen. This can be copied to an XML Notepad program to view it in a somewhat improved form, or you can save the results to an XML text file and open it with another program, for example Internet Explorer.
Please contact Intertec for a quote.
![]()
Migrating Intertec TimePro data
Q: If we started with the hosted solution and then later wanted to purchase the software and install it on our own network, would we be able to get the database downloaded?
A: Yes - the two systems (Intertec TimePro Hosted and Intertec TimePro In-House) use exactly the same database structure so we can do that quite simply. We would supply you with a database backup of your hosted data which you or your local IT server specialist would restore locally, alongside your Intertec TimePro In-House database, and then run our Intertec TimePro Copy script to transfer the data across. The work required for this service is usually around 4 hours. Intertec charges $170/hr (exc GST) for this work.
![]()
Q: We would want to have the ability to archive timesheets that are more than 3 years old in our Intertec TimePro Hosted system. Is this possible?
A: Yes - there are a number of options to archive/store data more than 3 years old:
- Purchase additional storage for time records greater than 3 years ($7.50/user/year inc GST)
- Archive yourself by using the Time Data Export (on the Timesheet Tab)
- Request Intertec to create a SQL database backup containing all of your Intertec TimePro data, which is provided to you on a CD/DVD or via download ($750 exc GST)
![]()
Q: How do I move my Intertec TimePro In-House installation to another server?
A:
- Install Intertec TimePro In-House on the new server - You can download the latest Intertec TimePro version from www.timesheets.co.nz/Free_Download.asp
Note: You need to run the same version on both your new and old servers. If your old server is running an older version of Intertec TimePro, then you will need to upgrade that older version to be the same as the version on your new server - this will enable you to transfer the data from the old to the new. - Verify that the new installation is working, albeit with the new freshly-installed empty database.
- If you wish to move your Intertec TimePro data from your old server to the new server see separate FAQ below.
- Transfer any other remaining data files form the old server to the new server:
If you use the Electronic Signatures feature of Intertec TimePro you will need to copy your signature files from the old version to the new version.
File Location: (usually C:\Program Files\Intertec TimePro\Web\TPxx\User\TP_\Signatures)If you have any Custom-built Intertec TimePro Timesheet Templates you will need to copy the files from the old version to the new version.
File Location: (usually C:\Program Files\Intertec TimePro\Web\TPxx\User\TP_\Templates)If you have any Custom-built Intertec TimePro Reports you will need to copy the files from the old version to the new version.
File Location: (usually C:\Program Files\Intertec TimePro\Web\TPxx\User\TP_\Custom)
![]()
Q: How do I move my Intertec TimePro In-House database to another server?
A: It is recommended that you have your SQL Server database administrator or local IT server specialist undertake this task. Whilst it is mostly a straightforward task, it can get involved with remapping user logins from one SQL Server to another to get the logons and permissions working again after the restore – this should really be done by a local specialist.
You may also want to refer to the following information from Microsoft:
How to move databases between computers that are running SQL Server
More detailed information from Microsoft on remapping SQLServer users and logins here:
https://support.microsoft.com/kb/274188
https://support.microsoft.com/kb/168001
https://support.microsoft.com/kb/240872
Note: You will most likely need to execute some user re-mapping commands similar to the following. However please note that the commands that you need to run on your sql server may be different to those listed below depending on how your particular database server was setup for Intertec TimePro. Read and understand the support articles above before running commands such as those below.
EXEC sp_change_users_login 'Update_One', 'tpadmin', 'tpadmin';
GO
EXEC sp_change_users_login 'Update_One', 'tpuser', 'tpuser';
GO
Note: If you are only moving the Intertec TimePro database to a new server (i.e. the Intertec TimePro In-House application is staying where it currently is) then all you will need to do once your Intertec TimePro database has been successfully restored is to edit the Intertec TimePro “global.asa” file in the following directory (or equivalent):
c:\Program Files\Intertec TimePro\Web\ (default install dir):
In the global.asa file you will find some references to your old database server in the connection strings – simply change these to point at your new database server.
![]()
Configuring Intertec TimePro settings
Q: How can I configure Intertec TimePro to match my timesheet requirements and process?
A: Intertec TimePro is highly configurable to address the needs of a diverse range of organisations with their own unique time management requirements. For example, you can select from weekly, fortnightly and monthly time periods and even decide on whether or not you wish to use start/finish times or simply worked hours for time entry.
Intertec TimePro also provides regional settings for handling currency types, tax rates and date formats of different countries. Following is a table listing the various configurable options in Intertec TimePro.
|
||||||||||||||||||||||||||||||||||||||||||||||||||||||||||||||||||||||||||||||||||||||||||||||||||||||||||||||||||||||||||||||||||||||||||||||||||||||||||||||||||||||||||||||||||
![]()
Technical issues
Q: Pages I revisit show old data. What do I do?
A: Symptom: You make changes to a detail page, or change selections for a report, and submit the changes, but the page you see does not reflect the changes.
Resolution: There are several settings in your browser or local network which can cause this behaviour.
See the following sections for more information:
![]()
Q: Data appears to save correctly, but I see the original data again, not the saved data. What can I do?
A: Symptom: You make changes to a detail page and submit the changes, but the page you see does not reflect the changes.
Resolution: First try the suggestions in the topic Pages you revisit show old data
Intertec TimePro has been verified to work with default personal firewall settings. However, if you have modified the standard settings to further tighten security, you may need to add rules to your firewall to allow the Intertec TimePro application to work.
![]()
Q: Why doesn’t the pop-up calendar appear when I click on the calendar icon?
Symptom: The calendar icon appears, but clicking on it has no effect.
A: The pop-up calendar works for all current browsers; however, you need to have Javascript enabled in your browser. If you have Javascript disabled, it also won't work. Follow this link to learn how to enable Javascript.
![]()
Q: Can I use Intertec TimePro while also running a personal firewall or content filter on my computer?
A: Firewalls such as Norton Personal Firewall, ZoneAlarm and many others, can be excessively restrictive. Content filters such as NetNanny and similar packages can also be restrictive in what they allow you to do and see. If you have such software, first try using a machine without such software, or disable the software. If this software is the cause of the problem, you will need to refer to the documentation or the help system for ways to make it less restrictive.
![]()
Q: Why can’t I receive emails generated by Intertec TimePro?
A: Emails from Intertec TimePro are sent from the address ‘notifications@timesheets.co.nz’. The reply to address can be set by going to Settings |System | System Email Address.
Emails in Intertec TimePro are sent through SendGrid. The IP address of this server is 167.89.46.198 should you need to whitelist it.
When you are setting up a new user in Intertec TimePro, ensure that you have set them up on your email server prior to sending them a Welcome Email. Sending an email to an address that does not exist will result in the email being added to our blocked list as it is marked as spam. If this does happen, you will need to contact our Support team to remove them from the Blocked list.
![]()
Q: What do I do if I’m still experiencing web browser issues running Intertec TimePro?
A: These are things you can try which might at least shed light on the problem.
- Refresh the page. Pressing the F5 key or Control+R will usually do this on most browsers, and usually there is a toolbar with a Refresh or Reload button.
- Hold the shift or control key down while doing a refresh as in step 1.
- Shut down all browser windows and start the browser up again - this will ensure that you start a new session on the server.
- Clear the local cache - see the separate notes which give instructions for each browser type.
- Try another computer - this will tell you if it's a problem specific to your normal machine.
- Restart your computer and try again.
- Call your technical people; they may know of network settings or security software that could be causing the problem.
![]()